The application of a sunburst finish on a banjo or other musical instrument can be a little scary if you have never done it. It can also be something you wouldn’t want to try without having at least seen it done before. This is how I perform a sunburst finish, and as usual, my techniques will evolve depending on what kind of equipment I have to work with, the space and my experiences experimenting as I go. Please enjoy, and let me know what you think. Remember … these pages are for information and entertainment only, so if you choose to try this you are on your own. Also remember to always wear the appropriate safety equipment whenever it is needed in any shop situation. Onward:
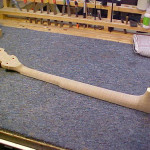
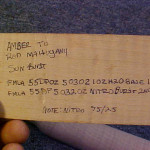
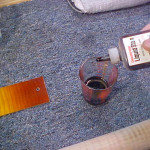
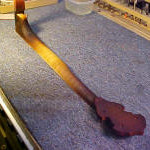
I have a neck and resonator ready for finishing. It is a left handed, custom piece and that the customer even supplied the maple for the neck. It is a great, 40 year old piece of curly maple that was wide enough so as not to need ear wood on the peghead. I select the color sample I have that he likes. I have the formula written on the back … looks pretty cryptic, but is is really saying 55 drops of concentrated, solvent neutral stain, available through Stewart MacDonald Guitar Shop Supply number 5030 to one ounce of water for the base coat. The finish must … MUST be sanded perfectly, wet with water in order to raise the grain, then sanded lightly with 320 grit paper, then wet again to raise the grain once more, then sanded again with 320, only taking off the “fuzz” that occurs when the wood grain is raised and let dry thoroughly between wetting and sanding each time, then allowed to dry a couple of days afterword before applying water based stain. Got it? … Good.
 |
 |
 |
 |
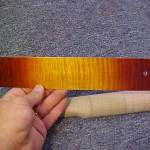
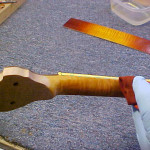
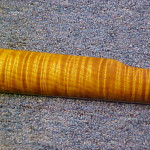
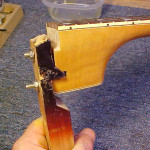
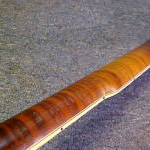
The water is measured and the stain is mixed, then applied evenly with a cotton rag. The curl pops right away, and since the grain has already been raised twice, it will not raise again if sanded properly. After the pieces have dried, the whole things gets a little dull and not so vivid and this is normal. The handle you see is one I made for finish work, and it attaches to a neck cut for a one-piece flange. I secure it with nuts and washers in preparation for the second color, the shading in the sunburst.
 |
 |
 |
 |
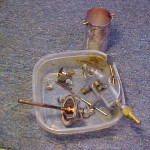
The neck and resonator are set aside and allowed to dry for a couple of days. This time the stain is mixed with a solution of 3 parts lacquer thinner to 1 part lacquer. We did change the formula for this one a little, straying from the color sample, but hey, this is custom work and we can do what ever we want, can’t we? It is imperative to clean your equipment in between every shoot. I own several of these jamb guns and keep one for clear, one for very dark colors approaching black, one for reds, one for browns, and a couple the are new just in case I get a weird request for blue, green, or whatever. So far they have served as stand-by guns in case I have a problem with one of my other ones. The stain is mixed and the gun is loaded. I use 2 ounces for this because the neck and resonator will be done at the same time. That is the best way to proceed because different woods, even the same type of wood, will absorb the same stain at different rates from one piece to another. You stand a much better chance of matching your pieces if you have them in the ray state.
 |
 |
 |
 |
Another note, any glue residue will prevent stain from being absorbed by the wood. You can spray clear coats onto a piece with no stain at all and then spray the stain (in that case the base coat will be mixed with the lacquer solution, not with water) directly on the clear coat. This is how most musical instruments are stained, but I think that the wood looks nicer, clearer, deeper and richer if the stain actually makes it into the grain. that is the other reason the lacquer solution is so thin. I want it to make it into the grain of the wood. I personally think that it looks nicer, but I am sure there are people out there who disagree … I really don’t care.
The gun should be adjusted so that the fan is reasonable wide and that mostly air is flowing. A test should be conducted on something other than the instrument you are working, even if you have done this a thousand times. Guns malfunction and things happen unexpectedly in the real world, so practice on scrap first.
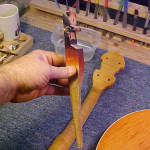
With the gun adjusted the way I need it, I hold it 8 to 12 inches away (sorry, I don’t do metric) and shade the heel, the headstock, the outside back of the resonator and the top and bottom (neck and tailpiece location) of the resonator’s sides. I stay darker on the outside and gently feather the sunburst gradually until is fades in to the lighter base color. It will naturally look dull and off looking at first.
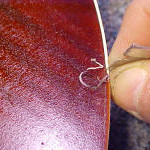
I do not tape off the binding for this, but I have used masking take designed for lacquer in the past with results that saved me time when scraping the binding, but I still had to do some scraping. This is the way I prefer and partly because scraping binding is therapeutic for me. It also lends a nice crisp edge if done correctly. In either case, allow the dark portion of the burst to dry then apply a clear coat on top of it to protect the color. Do not do this on a humid day or a rainy day or it will cloud up on you. The protective coat is 50/50 lacquer and thinner and will get absorber rather quickly. It should be thin and the only job it has is to protect while you scrape after it is dry.
 |
 |
 |
 |
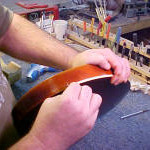
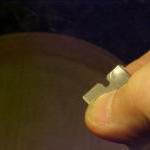
The scraping uses a safety razor blade that I control by pinching it between my thumb and index finger. Take your time on this as it can make or break the looks of the job. I advise that you start moving the blade the direction in which you will be scraping before you land on the binding. Otherwise you can end up with little cuts in your binding. Just a tip.
 |
 |
 |
 |
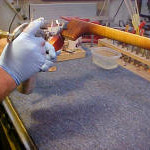
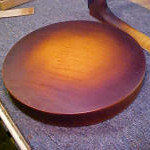
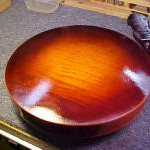
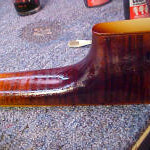
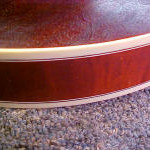
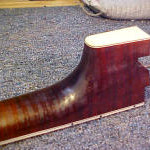
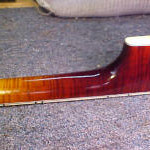
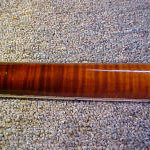
After the binding is clean the piece should be shot again, this time with full strength lacquer to seal your work. the last three photos are of the piece after the sealing coat.
 |
 |
 |
 |
 |
 |
Now you can start the finishing process.
I hope you have enjoyed this series on applying a Sun Burst Finish. Please let me know how I am doing.
Thank you,
Richie Dotson